DSLR Bokeh Tutorial
It seems that many Flickrites out there are struggling to get good bokeh shots. The good news is that shooting bokeh is one of the easiest photographic techniques to learn. Unfortunately, it is also one of the hardest to master. Here I will attempt to get you started with the basics. You’ll have to do the mastery part on your own :-)
Bokeh (pronounced: “boke-aay” or “boke-uh”- I prefer the latter) is the out of focus or blurry areas of a photograph. Wikipedia has a much more detailed description of the definition of bokeh that’s worth a read. On Flickr I find most people use the term to specifically describe out of focus highlights in a photo. For the purposes of this how-to we’ll focus (pun intended) on out of focus highlight bokeh.
The photo above made the Front Page of Flickr’s Explore last week. I wish I could say that this was a difficult and challenging shot that called upon all of my skills as a photographer. The truth is this was one of the easiest shots I took that night. These small aperture long exposure shots were a lot more difficult to get right:
The secret to shooting bokeh lies in its definition: out of focus highlights. You need three things to shoot bokeh: pin point highlights, a large aperture and a short focal distance. When I say pin point highlights I mean small light sources. Trying to shoot a large area of light like a window or fluorescent light does not typically produce the type of bokeh “balls” that we are looking for here. Small lights like Christmas twinkle lights are an obvious source, but any light source that is far enough away will become infinitely small and can produce bokeh. I find street and car lights in the distance at night make wonderful bokeh.
Next, we need a large aperture. For the novice, the aperture is the opening in the lens that controls the amount of light that makes it through the lens and shutter to the film/sensor. The smaller the f number (or f-stop) the larger the opening. This is usually expressed asf/5.6 , f/4
, f/4 , f/2.8
 , f/1.4, etc. Read more about aperture here. Typically the larger the aperture the larger the bokeh. Fast lenses below f/2.8 like my 20 year old manual focus Pentax-A 50mm f/1.7 SMC
 are ideal for shooting bokeh (and is the lens I use for most of my bokeh shots on Fickr).
That is not to say that one can not get great bokeh using lenses with a smaller maximum aperture like the typical kit lenses sold with most entry level DSLRs. The trick is to make sure you are using the largest aperture possible (smallest f number). To do this I recommend switching your camera into Aperture Priority mode (typically labeled “A” or “Av” on the program mode dial) and dialing in the smallest f number possible. With most kit lenses this will be f/3.5. Here is another Explore bokeh photo of mine shot with my kit lens at f/3.5:
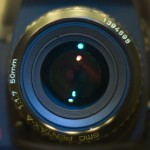
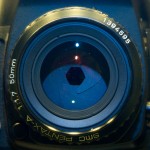
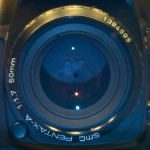
The other reason that you want the largest possible aperture your lens is capable of is to ensure that your bokeh is round and not faceted. You see, most lenses use 5-7 straight aperture blades to create the variable opening in the lens. Bokeh takes on the shape and size of the lens opening so smaller apertures will produce smaller, faceted and generally less pleasing bokeh. There are exceptions to this rule as most high end lenses use curved aperture blades that keep the aperture opening round at all f stops. However, if you’re shooting with a $1,500 Canon L series lens I trust you already know how to shoot bokeh ;-)
Aperture openings on a 6 bladed lens (mouse over for setting):
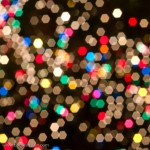
Bokeh shots at different aperture settings with this lens (mouse over for setting):


The last component to getting good bokeh shots is the focus distance used. I have found that the shorter the focus distance to the foreground subject, the better the background bokeh I will get. The idea is to get as much distance between the subject and the bokeh producing highlights. Also, the closer you are focused to the camera the shorter the depth of field (DOF) will be. This ensures those lights way off in the background will be nice and blurred out.
The focal length of the lens is also a consideration. Depth of field is basically a function of focal length, distance to subject and aperture. At a given aperture and distance longer focal lengths result in shorter DOF. A short DOF is what we need to effectively blur the background highlights to produce bokeh. Getting close to the foreground subject and zooming to the longest setting on your lens will likely put you where you need to be to capture killer bokeh.
Here we have an example of close focus on the foreground subject coupled with a wide open aperture and longer focal length to create bokeh from small lights in the background:
When I took this shot I was at the minimum focus distance for my 50mm 1.7 lens (about 18-20″). The white (gold colored here) twinkle lights were on another Christmas tree approximately 8-10′ behind the light bulb and branch I focused on. The other smaller colored bokeh highlights were from other lights on the same tree that I focused on.
TUTORIAL:
Now that I’ve rambled on ad nauseam about all the intricate details of capturing bokeh, let’s get on to the part where you actually go do it!
For DSLR users (point ‘n shooters will have to wait for another tutorial):
- Set your camera to Aperture Priority mode (A or Av on the program dial).
- Select the smallest possible aperture (f) number for your lens (should be ≤f/4).
- Switch your camera to manual focus and manually adjust the focus to the closest setting.
- Zoom your lens to somewhere around 50mm.
- Find some nice points of light at a distance of 10′ or greater from the camera (your Christmas tree is the perfect subject this time of year).
- Fire away!
If you get a shutter speed that’s too slow (ie: less than 1/30 second), try bumping the ISO up to 400 or more. If you do the Christmas tree thing what you should get is something like this:
Depending on how dark the background is (darker usually = better) you might have to dial in some exposure compensation to get your bokeh to really pop. This image looks like it came out fine without any, but I often have to dial in +2/3 to +1 EV for my 50mm 1.7 on my Pentax K10D.
Next, try putting a subject of some sort in front of the camera at the minimum focus distance (or there about) with the bokeh highlights in the background. It’ll take a little playing around with subject matter and lighting (both foreground and background) but in no time you should be shooting bokeh like a pro! For more examples, be sure to check out my bokehliscious set on Flickr.
Please let me know in comments if this is helpful to you and/or if you have any questions or suggestions. Also, feel free to post links of your bokeh attempts for everyone to enjoy. Thanks for stopping by.
Happy bokeh-ing!
credit : robertsdonovan


1 comment:
huh
Post a Comment